Tuesday, April 30, 2013

~ROMANTIC CRAZY QUILT CUFF CLASS INTRODUCTION~

Welcome to the Romantic Crazy Quilt Cuff class!

I hope you will enjoy exploring and combing the time worn traditions of quilting, embroidery, and beading, along with making unique handmade embellishments to create a soft sculpted romantic cuff that is sure to be a unique accessory to add to your wardrobe.
(Sample of an antique velvet and silk crazy quilt)

The foundation of the cuff we will be creating is referred to as "cray quilting".  This term is applied to the textile art of crazy patchwork that lacks repeating motifs of traditional quilts.  Crazy quilting does not actually refer to a specific kind of quilting in which the needlework binds two or more layers of fabric together, as a crazy quilt rarely has the internal layer of batting that is part of what defines quilting as a textile technique.
Regular patchwork combines pieces of fabric that make a patterned or regular design, but crazy patchwork uses irregular pieces of fabric without a set pattern or design on a foundation of fabric or paper.  This creates haphazard-looking design.  The patches of fabric and the seams are usually heavily embellished with embroidery.
Crazy quilts differ from "regular" quilts in other ways as well.  Because there is less emphasis on the design of the quilt, the quilter is able to employ much smaller and more irregularly-shaped pieces of fabric.  In comparison with standard quilts, crazy quilts are far more likely to contain exotic pieces of fabric, such as velvet, satin, tulle, or silk, and embellishments such as buttons, lace, ribbons, beads, or embroidery.  We are going to apply all that opulence to the cuff we make.
In this class we will be taking crazy quilting back to it earliest original form which was not as a bed or pillow covering but to be worn.  Not in the fashion of the Venice carnival character who appeared in a "particolored" costume or that of Japanese Nobility, whose patched kimonos of silk and wool were often hand painted and heavily embroidered, but to a much simpler modern day version.  We will take a cue from the Victorians who created a crazy quilt stir in the 1880's when this fad swept the United States and create something that is opulently romantic.
Crazy quilting is extremely free-flowing by nature and you really can't mess it up.  This choice of building our foundation will also serve as a way to use up those small or odd-shaped studio scraps that are left over from other projects.

 GATHERING:
The first class assignment is to simply gather all your supplies for ease of working through each lessons steps.  

LESSON MATERIALS LISTS:

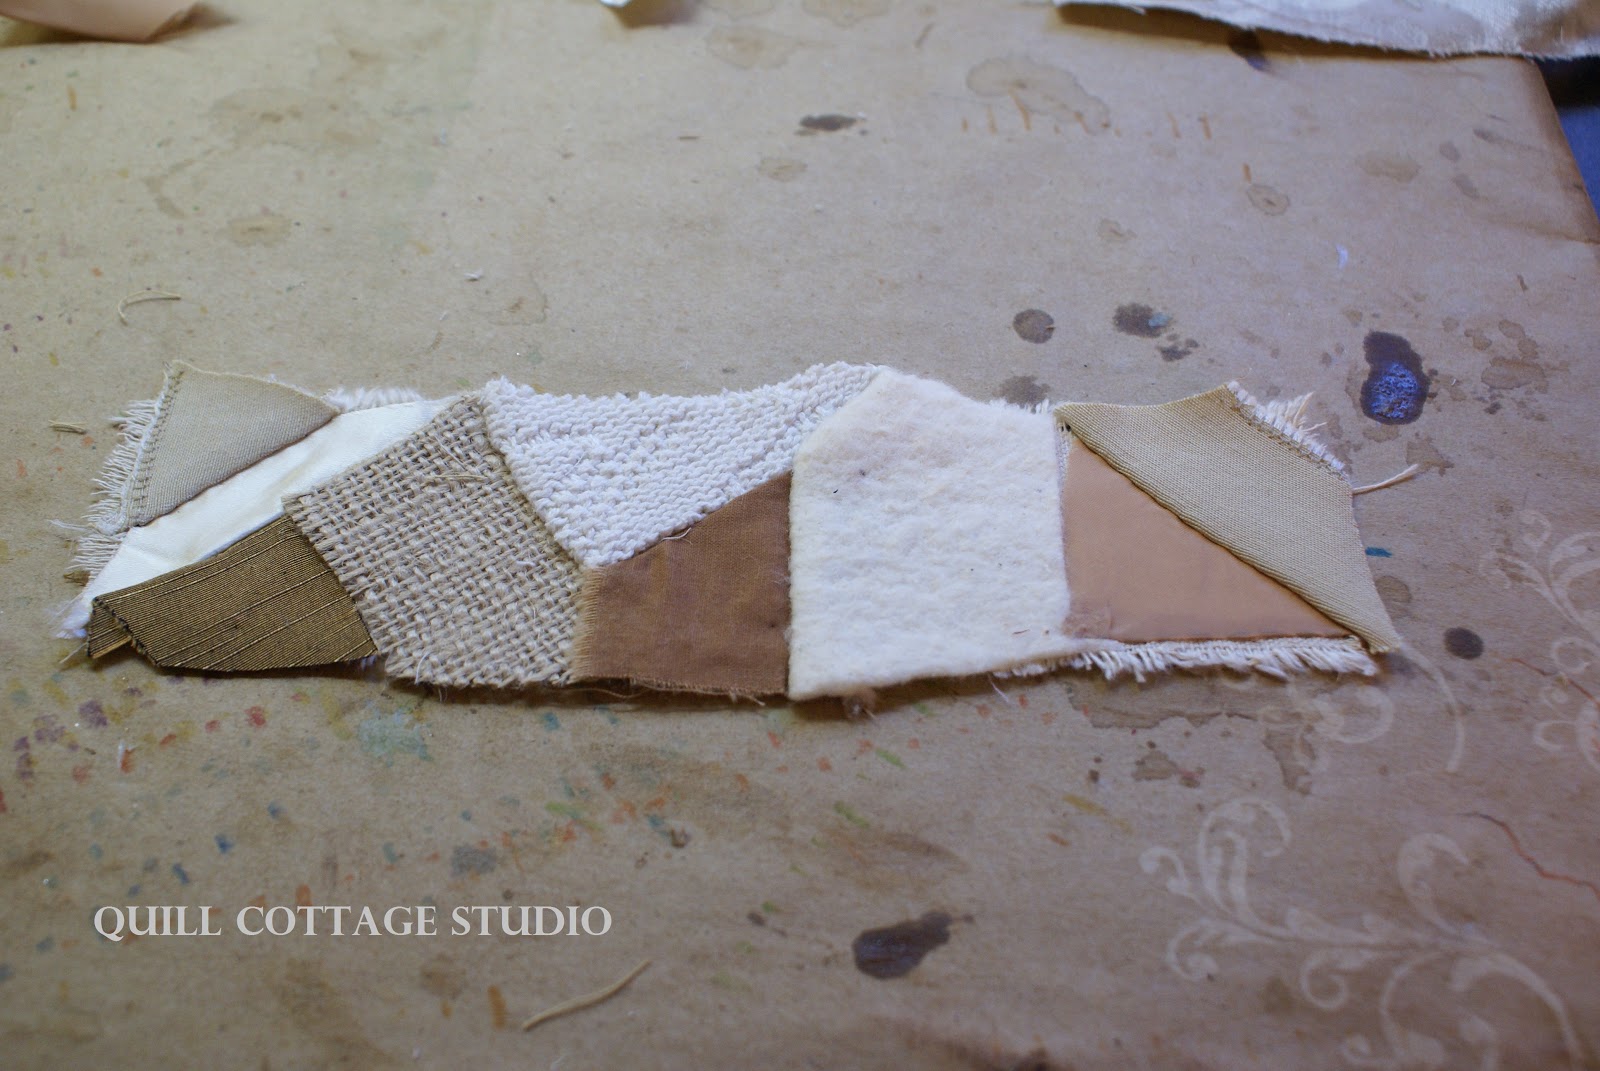
LESSON 1:  BUILDING A FOUNDATION
 * 9 inch by 6 inch piece of cotton canvas

* Small scraps of fabric  of your choice

( I used bridal satin, duponi silk, burlap, cotton batting, satin acetate lining, and a piece of a favorite old fisherman's knit sweater)

* Needle and Thread  (sewing machine if you prefer)

* Scissor

* Sewing Pins

* Iron

***********************************************************************************

LESSON 2:  ADDING LAYERS AND TEXTURE
 * Scraps of lace, trim, and fiber

* Embroidery Floss to match your fabric choices, you can use one single color or more than one color as you change to various stitches OR thread to match your project if you choose to use a sewing machine that has a variety of decorative stitches

* Embroidery Needle

* Scissor

* Misc. embellishments such as buttons, beads, etc.

HeatnBond iron on adhesive hem tape OR Aleene's Original Tacky Glue
(You can get these products at most craft/hobby stores or big box stores but just in case I have listed the links to purchase them online)

************************************************************************************

LESSON 3:  ADDING EMBELLISHMENT
* 1 Silk flower, a rose works well

* StazOn ink pad in color of your choice
 (I used Saddle Brown)

* Rubber stamp of your choice
(I used a Tim Holtz Shabby French  small script stamp, I purchased mine at Hobby Lobby at half price sale.  Don't forget if you order online to use that coupon code! ) 


* Center Embellishment: a vintage earring, ornate button, bead pearls, or object of your choice
OPTIONAL: Self-cover buttons or use the provided mini tutorial for creating a portrait button embellishment.
NOTE: if you decide to create a portrait button you will need the following:
Photo of your subject
 (a relative would be nice or I have provided you with some vintage images to use with this lesson)
Scanner and Printer
cotton muslin
quilt batting
needle and thread
1 inch plain button or 1 inch circle of foam core or corrugated cardboard 

* Scissor


*Instant Coffee

* Warm Water

* Spoon and Small Bowl

OPTIONAL:  Piece of cotton muslin to dry cheese cloth on, this way you get a surface dyed piece of fabric for use in another project.


* Needle and Thread

* 26 Gauge Wire
(I used VINTAJ natural brass bronze colored wire)  

* Seed beads of your color choice

* Jewelry Pliers, Round-nose, Long-nose, and Diagonal Cutters

* Scraps of lace

*8 beads, I used glass pearl beads

OPTIONAL:  Copper head pins, seed beads (same as used on leaves), small pearls or crystal beads

************************************************************************************

LESSON 4:  FINISHING TOUCHES
 * 1/2 Inch by 6 Inch strip of cotton muslin

* Small alphabet stamps 

* StazOn Ink ( I used Saddle Brown)

* 1 yard lace of your choice

*  Extra dyed cheese cloth from week 3

* Scissor

* 2 inch by 9 inch piece of flannel fabric


* 2 inch piece of 1 inch wide sew on hook and loop tape (Velcro)

Monday, April 29, 2013

LESSON 1 BUILDING A BACKGROUND...

LESSON 1:

In preparing this class I have tried to anticipate, illustrate, and address any quirks you might encounter in the Crazy Quilt piecing process since you don't use a pattern, the main thing is to remember that this is a free form sewing art so you cannot mess it up.  The background of this piece will not necessarily look "pretty" when you finish it, remember, its all in the details that will follow that will bring the piece together.  
Relax, enjoy, have fun!
 
The main supply lists for the entire class can be found on the introduction page but for ease of convenience I have also included individual lists in each lesson, feel free to substitute any materials with what you have on hand.  I have included specific brands and links for those who want to know exactly what I used in this project but do not feel it is necessary to follow suit.  Remember, make it your own!

To get started you will need the following:
 * 9 inch by 6 inch piece of cotton canvas

* Small scraps of fabric  of your choice

( I used bridal satin, duponi silk, burlap, cotton batting, satin acetate lining, and a piece of a favorite old fisherman's knit sweater)

* Needle and Thread  (sewing machine if you prefer)

* Scissor

* Sewing Pins

* Iron
Read through all the instructions before beginning to get an understanding of the process.
 Tear or cut a 9 inch by 2 inch strip of cotton canvas.

 Since this is a soft cuff construction that does not use a metal cuff blank for support you need to use a heavy weight fabric such as cotton canvas for your base or your cuff will not support the embellishment.
 Select some of your favorite fabric scraps, you will want to select 8 or 9 different fabrics.
Don't limit yourself to neutrals if that is not your style, go crazy with color and personalize this project to your tastes, some suggestions are old vintage doilies for an all over lace look, vintage handkerchiefs for some spectacular floral fun, lush velvets and silks for an opulent look, or how about down home denim and burlap for country cutie chic.    
 To start building your crazy quilt background, cut a small triangle of one of your fabrics  
Lay the triangle right side up on one corner of your canvas base as shown above.
Flip the fabric face down, keeping it lined up so that when you sew the seam and fold it back towards the corner it will match the canvas edge, pin in place

 NOTE:  I used a dark thread for teaching purposes so you could see the stitching, you will want to match your thread to your fabric.
 Thread a needle or sewing machine with thread matching your fabric and sew across small triangle leaving a very small seam allowance, remove pins, and clip excess threads. 
 Using proper setting on your iron for fabric type, press the triangle back towards the corner, and pin in place.

NOTE:  For demonstration purposes and ease of photographing I have used a small craft iron in the photos, I do not recommend that you use this is the pressing of your fabrics as it does not have a temp setting that is adjustable to various fabrics and might scorch your piecing.
 Select another scrap of fabric, lay the right side of the new scrap against the right side of the first piece and pin in place.
 Stitch fabric in place stitching right up against the first piece of fabric, remove pins, and clip excess threads
Iron seam and pin in place.

Remember Crazy Quilt piecing is not a precise placement other than to have the seams sewn butted up against one another, take a look at the examples below in this piece of this antique pillow top, you will notice the irregularity of fabric shapes and placement. 
 You really cannot mess this up.
Your placement may not look exactly like mine but it is not supposed to since this is not a precise pattern so don't get anxious and just let your unique design unfold.
 Clip away the excess fabric.

Clipping the excess fabric as you work will help you to better visualize your design and your piecing placement rather than trying to work with the extra bulk and sight distraction of fabric hanging off the edges.
Continue adding fabrics in the same manner as described above, pinning, sewing, ironing,  pinning ironed piece in place, and clipping away excess fabric until you have the whole surface of the cuff base covered as illustrated in the photos below...
Remember to change the direction of your fabric for more added interest or you might come out with more a a stripe effect rather than a random pattern.
 Consider your fabric selections as you work to create light, medium, and dark areas as well as contrasts of texture, this makes your design more interesting.
In order to place some of the pieces you will not always have a clean seam line, as shown above, stitch it anyway you need to in order for it work then simply trim the excess fabric for a clean seam allowance after sewing.

 Continue ironing, pinning, and piecing...
Sometimes your fabric pieces might be too large for the design as shown above
Use them anyway stitching only what is needed for your piecing then trim away the excess
You may also encounter an awkward angle as shown below...
 Stitch along your seam angle, trim away excess fabric for seam allowance, then press in place, you may have to do a little tucking or snipping of extra bulk of fabric in order for it to lay smooth
 Once you have worked out the layout, press, then trim away any excess

Your cuff base should be looking pretty patchy by now...
 When you reach the last section of your cuff base you may have to change the direction of your piecing in order to cover it, the great thing is that direction does not matter with this process, it is very forgiving...
 You are going to notice in the stitching below that I ended up with one seam that is not sewn up the side, if you encounter this its perfectly fine, it will be secured in a later step.  However, the idea is to secure as many seams as possible in the piecing process for a sturdy base construction.
 
 You can see my open seam at the point of my scissor below between the cotton batting piece and the satin piece...
 I just pinned the open seam securely in place and continued to add my last piece of fabric...
  You are almost there!  Just keep stitching, just keep stitching...
 Press, snip, clip, and...
 

You are...
Done! building your cuff base...
 Remove all the pins from your completed cuff piece and give it all one final press on the front and back side.

Your cuff base may have become somewhat distorted in shape due to the irregular piecing and stitching, no worries here either, turn your cuff over so you can see your backing piece, simply even it back up by trimming any uneven edges and you are ready for the next lesson!

In the next lesson we will be adding textures and layers through fiber, embellishments, and stitching.

blessings,
Sandy